
Markdown viewer & statusline
Claude often writes plans, notes and READMEs as Markdown. Perch’s Markdown viewer lets you read and edit them next to a live preview. The statusline designer lets you build the status line Claude Code shows in the terminal, with a live preview, and apply it to any of your config directories.
Open the Markdown viewer
Section titled “Open the Markdown viewer”There are a few ways in:
- Right-click a session on the overlay and choose Markdown files…. This item is always there.
- Click the Markdown glyph on a session row. With Markdown glyph on, it appears on any session that
produced a
.mdfile. - In a session window, Ctrl+click a Markdown file path to open it in the viewer.
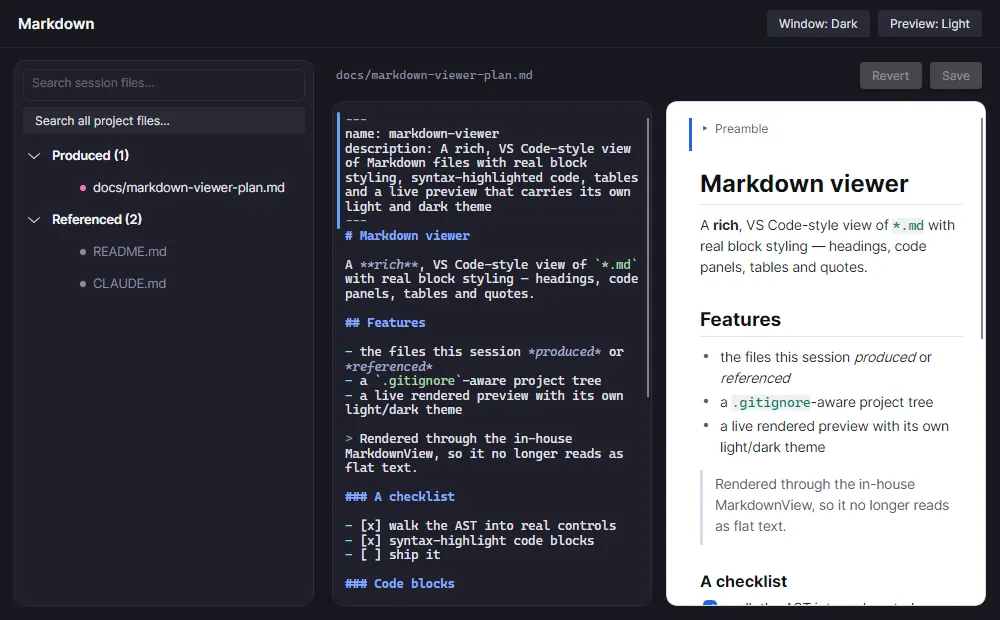
The left pane lists the files that session Produced and the ones it Referenced. The list updates live as
files are added or edited. Type in the search box to filter it, or click Search all project files… to search
every Markdown file in the project. That search respects .gitignore.
Read and edit
Section titled “Read and edit”Selecting a file opens it in a split view: the source editor on the left and a rendered preview on the right. Both are syntax highlighted, and clicking in the preview moves the editor’s cursor to the same place. Front matter, such as a skill file’s header, folds into a collapsed Preamble block in the preview.
- Save (Ctrl+S) writes your changes. If the file changed on disk since you opened it, for example because the session is still editing it, Perch asks before overwriting.
- Revert discards your unsaved changes and restores the last saved version.
- If the file changes on disk while you have no unsaved edits, the viewer reloads it quietly.
The viewer has its own theme, separate from the app’s. Use Window: Dark/Light in the header for the window, and Preview: Light/Dark for the preview pane, which starts light so rendered Markdown reads like paper.
You can drag a selection across headings, lists, code and tables in the preview. Copying it copies the Markdown source. Right-click the selection to copy plain text instead.
Find and replace
Section titled “Find and replace”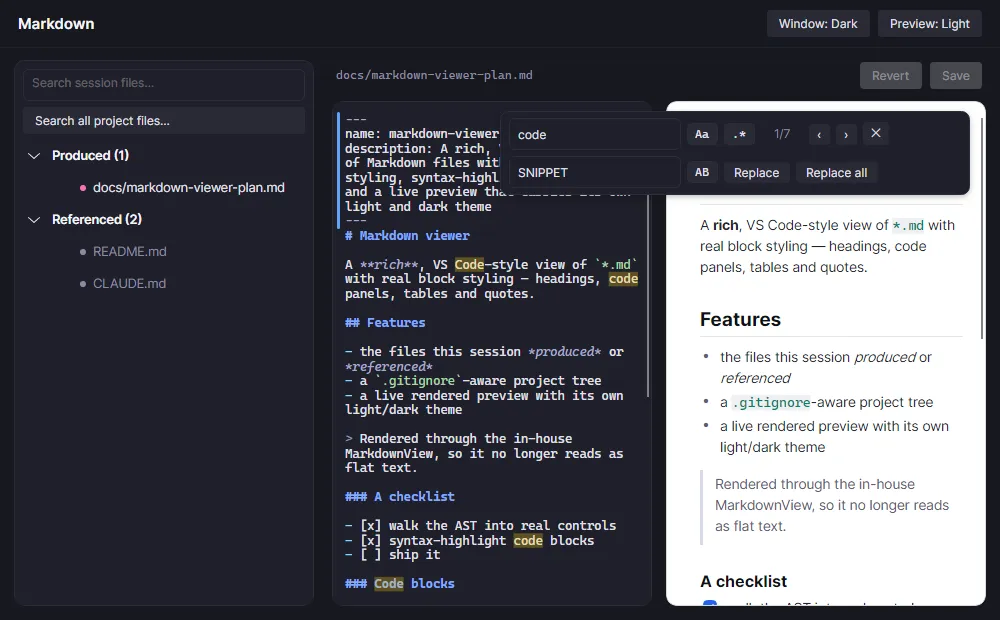
- Ctrl+F opens find in the pane you last used. A button on the bar switches between searching the source and the preview.
- Enter and Shift+Enter move to the next and previous match. Esc closes the bar.
- Aa matches case (Alt+C) and .* uses a regular expression (Alt+R).
- Ctrl+H opens replace, which works on the source. Replace (Enter) replaces the current match and Replace all (Ctrl+Alt+Enter) replaces every match. AB preserves case when replacing (Alt+P).
Design a status line
Section titled “Design a status line”Claude Code can show a status line under its prompt, produced by a command you set in settings.json. Perch’s
statusline designer builds that line from a template, shows a live preview, and writes the setting for you.
Open it from the tray menu (Statusline designer…) or from Settings → Config directories → Open status line designer….
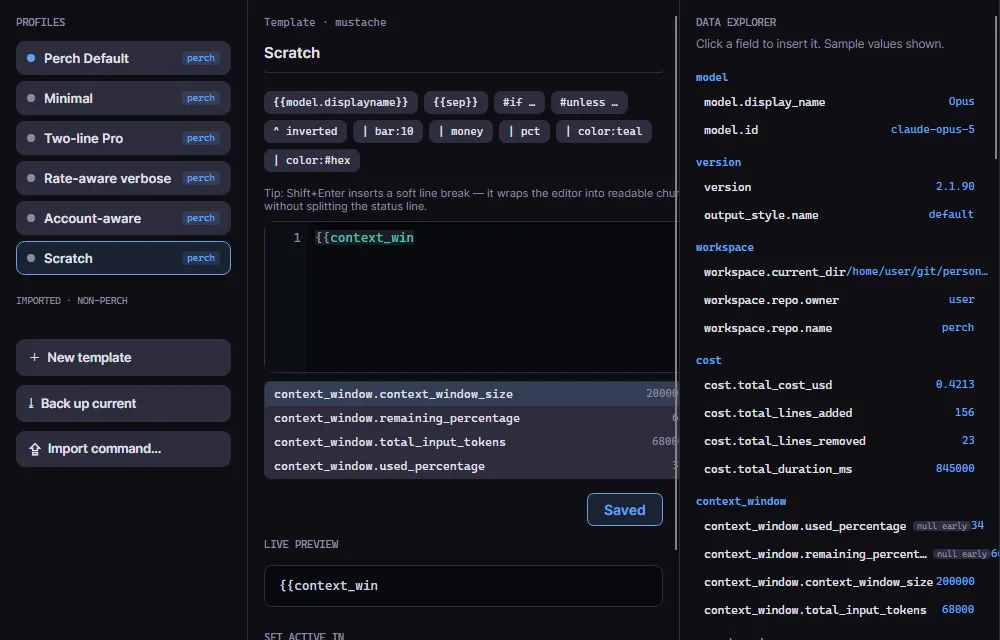
- Profiles on the left. Perch ships five built-in templates: Perch Default, Minimal, Two-line Pro, Rate-aware verbose and Account-aware. Built-ins are read-only: click Duplicate to edit to make your own copy, or New template to start from scratch.
- Back up current saves whatever status line command is in your settings now as an imported profile, so you can always switch back. Import command… adds any other status line command, such as ccstatusline. Perch runs imported commands as they are.
- The editor in the middle has syntax highlighting and autocomplete. Shift+Enter inserts a soft line break, which tidies the editor without splitting the status line. A plain Enter starts a new status line row.
- The data explorer on the right lists every field Claude Code sends, with sample values. Click a field to insert it.
- Live preview shows the result in colour. Click Save to keep your changes (an unsaved marker shows until you do) or Revert to go back to the last saved version.
- Set active applies the profile. With several config directories you get a Set active for each one, plus All directories.
How it runs
Section titled “How it runs”Setting a Perch profile active compiles it to a standalone script, perch-statusline.mjs, in that config
directory, and points the directory’s statusLine setting at it with node. Perch is not involved when Claude
Code refreshes the line, so it keeps working when Perch is closed or even uninstalled. You need Node.js
installed for it to run.
Template basics
Section titled “Template basics”Templates use {{ }} tags:
{{model.display_name}}inserts a field. Paths are dotted, as the data explorer shows them.{{context_window.used_percentage|bar:8|pct}}pipes a value through filters, left to right.{{#if git.branch}}…{{/if}}and{{#unless …}}…{{/unless}}are conditionals, with{{else}}and{{elseif …}}branches. Comparisons such asa > 80work.{{#bg:red}}…{{/bg}}paints a background behind everything inside.
Useful filters include pct, round (round:2 for decimals), money, k, bar:N, trunc:N, default:X,
upper, lower, color:NAME and ctxcolor, which colours a value by your context-pressure thresholds.
Perch adds a few fields Claude Code does not send: git.branch, the signed-in account (account.org,
account.email), and perch.guardrail.mismatch, which is true when the session is on the wrong account for
its folder. The built-in Account-aware profile uses these to flag a wrong-account session in red. See
Multiple accounts.
From the command line
Section titled “From the command line”perch statusline manages the same profiles from a terminal:
| Command | What it does |
|---|---|
perch statusline list |
List saved profiles and mark the active one. |
perch statusline use <name> |
Make a profile active: generate the script and write settings.json. |
perch statusline backup [name] |
Save the status line currently in settings.json as a profile. |
perch statusline import <name> "<command>" |
Save any other status line command as a profile. |
perch statusline install |
Set up the default profiles and apply the active one. |
Run perch statusline with no verb to render the active profile from Claude Code’s JSON on standard input,
which is handy for a quick local preview.
Settings
Section titled “Settings”| Setting | What it does |
|---|---|
| Markdown glyph | Show a glyph on a session that produced a .md file. The Markdown files… right-click item is there either way. |
| Context pressure thresholds | The yellow, orange and red bands. The status line’s ctxcolor filter uses the same bands. |